By Dan Beard
HOW TO MAKE YOUR OWN SNOW-SHOES

Plenty of Tumbles,
But You Will Soon Learn
The snow-shoe has always been an exceedingly difficult problem for a boy to solve. This is not because of lack of skill on his part, but rather because the material used for the net-work by the Indians is practically unobtainable in the settled parts of the country. In every thicket, woods, or brush field, however, we have material from which we can build the brush shoes shown in the following diagrams.

Fig. 378.
The Snow-Shoe Frame Sticks
In the first place, we want two sticks of some tough wood like ash or hickory. Make the first one about one inch wide, one-fourth of an inch thick, and about eleven inches long. Smooth the stick off with your penknife, then cut the notches A B and C D at the ends of the stick, so that the distance between B and C will be about nine and one-half inches (Fig. 378). Make the other stick similar in form to the first one, and cut the notches A' B' and C' D' so that it will be six and one-half inches between B' and C'.
Next you need two long, tough sticks, such as you may cut from the growing brush or whittle from good, seasoned wood. In selecting them, choose the ones that are about one inch in diameter at the big ends G and E (Fig. 378). Cut off the small ends of these sticks so that they will measure about forty-eight inches from E to F and G to H.

Fig. 379.
The Snow-Shoe Frame
Next take the longest flat stick and with some fine cop- per wire bind it to the two long sticks, as a brace and spreader, about seven inches from their big ends E and G (Fig. 379). Fig. 380 shows the big ends drawn nearer together by a copper wire. The first cross-piece should be just six inches below the center of the top wire, and the second cross-piece, or brace, should be just twenty inches below it (Fig. 379).
To stiffen the frame, run a copper wire from A to D' and from D to A' (Fig. 379). Now, if you have secured some rattan, the rest of the work is comparatively easy; but if you have no rattan you must spend some, time and trouble in selecting fourteen or more strong, light sticks. Cut one of them so that it will make a stick eight or nine inches long.
Fasten it in the center of the first brace by binding it with copper wire, and make it fast with copper wire at E and G. The other part of the stick is fastened to the lower brace (A' D') at its center in such a manner that the upper end of the stick is two and one-half inches below the first or top brace (Fig. 380).
Next bind the tail ends H and F to each side of this center stick (Fig. 380). Place a stick on each side of the center one in such a manner that there will be a space of two and one-half inches along the bottom of the first brace between these two sticks (Fig. 381). Then put the other sticks in place (Figs. 381 and 382).
When this is done take a piece of copper wire and, beginning at E, wind it in a loop around each stick and then in a loop around the wire E G, as shown in the detail sketch below (Fig. 382). With a sharp knife trim off the ends of the sticks at the toe of the shoe and wire the tail ends to the frame, as they are in Fig. 382, and trim off.

Evolution of Snow-Shoe
We need a strap for the ball of the foot to rest upon. This strap should be woven in and out of the basket (Fig. 382, K).
There should be holes punched with an awl or small nail in the strap where it crosses each of the sticks, and copper wire run through them to bind the strap fast to the basket-work. The two middle sticks should be spread apart at the strap so as to make it just three inches from stick to stick, measured along the top edge of the strap, as shown in Fig. 382.
This leaves the necessary toe hole. Now bring the two ends of the strap up around the outside sticks E F and G H, and bind them there with copper wire (Fig. 384). When this is done, on top of the other strap bind a toe strap (Fig. 383). Bind this with copper wire run through holes in the strap, as you would sew it, and wrapped around and around (Fig. 383).
Make your second shoe exactly like your first one and you will have a pair of serviceable shoes with which to travel over the surface of the snow. To do this however, it will be necessary to bind the snow-shoes to your feet, and it will also be necessary for you to wear moccasins, slippers, or heelless soft shoes. Snow-shoers always wear heavy woolen socks. Put on two pair, pulling one pair up around your legs and rolling the other pair about the tops of your slippers. They will not only keep your feet warm, but the roll around your ankles will keep the snow from out your slippers.

Fig. 385.
Showing How Thongs are Attached
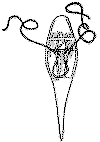
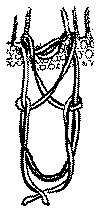
To bind the snow-shoes to your feet you will need two long thongs of buckskin, leather, or some substitute, one for each foot, which will not tie in hard knots or hurt your ankles. To put on the snow-shoes, put the thong in as shown in Fig. 387, place your foot upon the shoe so that the place where your toes are joined to the rest of your foot rests on the strap.
Draw the heel loop so that it will fit tightly around the heel of your moccasin. Next bring the ends of your thong down under the side sticks and up across your instep (Fig. 387), making a hitch at each side of the foot and bringing the two ends together around your ankle just above your heel, where they must be tied in a square knot (Fig. 388).

Fig 386.
The Thong That Binds the Toe
In Figs. 385 and 386, I have left off the toe strap so as to simplify the diagram, but Fig. 388 shows the toe strap and also shows how the part of the thong which crosses the instep goes under the strap at one side and over the strap at the other. Fig. 386 shows how to make a toe strap with the thongs.
After you have bound your feet to your snow-shoes in this way (Fig. 388), which is the Iroquois Indian method, you will find that while your foot is securely fastened to your snow-shoe its movement is not impeded. The heel is perfectly free to move up or down or sideways, and the toe hole in the snow-shoe allows perfect freedom in the movement of your toes.
There is only one way to learn to walk on snow-shoes, and that is to put them on and try. After stumbling around and falling down, standing on the heel of one shoe with the other shoe, so that it is impossible for you to lift your first foot, and getting into all manner of ridiculous scrapes, you will learn the knack of shuffling along as a person does in slipshod slippers, and after this it will be only a short time before you become an expert snow-shoer.
