By Dan Beard
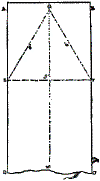
Fig. 16.
How to make the triangle
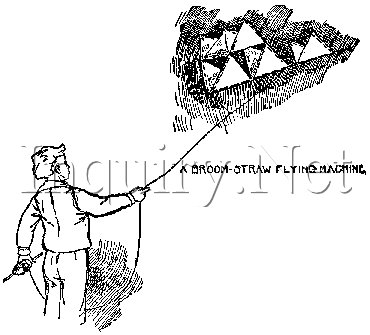
If my readers are not content with primitive flying machines like the Luna Kite, a Flying Machine that can lift a man, and yet this powerful engine will be built on the same principle as the broom-straw air-ship here described:
How to Make Equal Lateral Triangles
Take a piece of-lightweight writing-paper and cut it into a strip about five inches wide (Fig. 16); fold it lengthwise so as to make a crease in the center of the paper, as shown by the dotted line G M. Do not make a deep crease, but a light one, just sufficient
To Mark the Center of the Paper
Now fold the paper crosswise so as to make a deep crease at E F, then take another small slip of paper and
Make a Ruler

Fig. 17.
The paper ruler

of it by folding the strip lengthwise, as shown by Fig. 17; lay this ruler along the crease E F (Fig. 16) and with a lead-pencil mark a line (on the ruler) at K (Fig. 17) to correspond with the edge of the big piece of paper at E (Fig. 16), and mark another line on the ruler at L (Fig. 17) to correspond with the edge F of Fig. 16; put a pin in the ruler at K and let the point go into the table or drawing-board at E alongside of the piece A B C D (Fig. 16) ; swing the ruler around until its edge at the mark L just touches the line G M, then holding the ruler there, rule the line G E, next rule the line G F and you will have a triangle of equal sides, that is, E G = E F and E F = G F.

Fig. 18.
How to fold the paper.
This is a simple way to make an equilateral triangle; but do not be alarmed, we are not going to demonstrate a proposition in geometry, but simply cut some triangles out from the paper for material for our Air-Ship. To do this, fold the paper again at E F, as shown by Fig. 18, but it must be so folded that the side edges correspond with each other and folded as tightly as the leaves of a closed book. Then take the scissors and
Cut Out the Two Sides
Fig. 19.
How to cut the paper.
Fig. 20.
Paper cut and ready for straws.
of the triangle G F and E G, as shown by Figs. 19 and 20, the last being a perspective view of the double triangle sail or set of wings. Make five of these sets of wings and see that they are all of-them alike in dimensions. That is, supposing E F to be five inches, then E F, E G, and G H of all the triangles will each be five inches. I use five inches only because the air-ship or flying machine which I built was made with five inches; the measure of each side of each triangle, and as this airship sailed well, I feel safe in giving the same dimensions to the reader.
It is evident that
Flimsy Writing-Paper
alone will not stand the pressure of even a light breeze, but if we stiffen it along the edges with broom straws, it is astonishing how strong this
Fragile Appearing Air-Ship
will be.
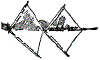
Fig. 21.
Two double triangles on on straw

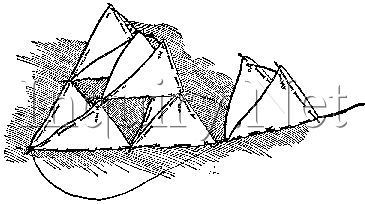
We need one or more strong, stiff straws for the keel of the ship, as shown in Fig. 21, and we can put them in place by weaving them in and out of a series of small slits cut for the purpose along the center folds of the wings or sails; in a like manner we can stiffen the sides of the wings as shown by Fig. 21.
To Prevent the Wings from Closing
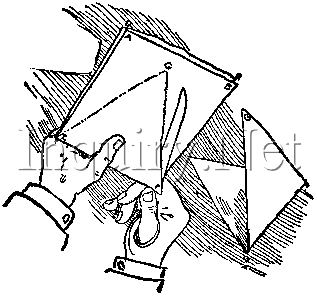
together when the winds blow against them, it is necessary to have some braces, and these may also be made of broom straws with their ends split B (Figs. 22 and 23), or bent over, as at B (Fig. 24), and made fast to the points of the sail by pasting a small piece of paper over the split ends, as at B (Fig. 23).

Fig. 22: Shows how to split the end of a straw.
Fig. 23: Shows how to paste down the split ends.
Fig. 24: Shows the straws bent down and woven into the paper.
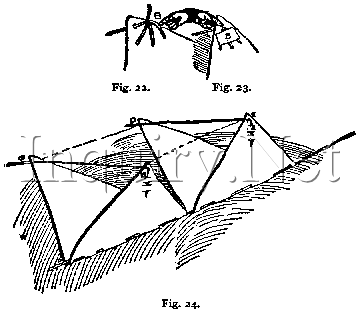
After fastening one end of the brace straw, as in Figs. 23 or 24, take your paper-ruler (Fig. 17) and placing L of the ruler at the edge of the sail, press the opposite wing tip (C, Fig. 24) inward until the edge of this wing corresponds with the mark K on your ruler, then split or bend your brace straw at K and you will have B C (Fig. 24) equal to each side of the triangle, and B C D E (Fig. 24) will be a perfect square. We will need
Another Set of Wings
on the keel to place behind the two (Fig. 24) already in position; but these wings are stiffened with straws on their after edges and not on their forward edges, as may be seen by referring to Figs. 25 and 26.

Fig. 25
A close inspection of this Fig. 26 will also show how the straws are used to connect the two pairs of top wings to those below.
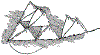
Fig. 26
Of course a little paste would make this more secure, especially if the lower ends of the straws, reaching down on the cover sail, were split and spread fan-shape on the paper, then covered with paste and a paper patch, like the patch shown at B in Fig. 23. But the problem which interested me was to build a flying machine of
Nothing but Paper and Broom Straws,
using no tools of any kind but my fingers and a pair of scissors, and Fig. 26 was the result.
The Belly-Band
was attached as shown in the diagram and, picking up a spool of thread from a basket of sewing material, I carried the fragile toy up to the roof to test it, and it sailed away on the breeze like a real, full-grown flying machine. The parts held together until it got mixed up with a chimney while I was pulling it in; even then it was not wrecked, and the only damage done was the slipping of some of the brace straws. The kite was flown in a light breeze--a strong wind necessitates a stronger kite.
By duplicating the front kite and placing it where the rear wings are, you will have a Pyramidal Box Kite.