By Dan Beard
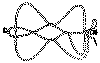
Fig. 318.
Plan of the Diamond Hitch.

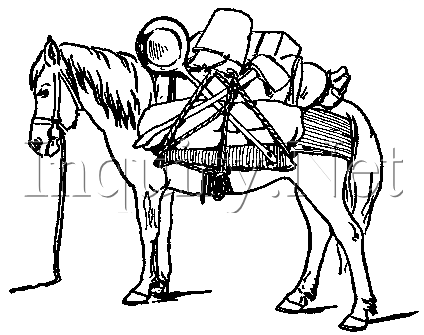
If you have a pony, horse, or mule for a pack animal, it greatly facilitates the transportation of camping material, and furnishes you with many more conveniences, such as additional cooking utensils and extra clothes. All campers traveling with pack animals owe a debt of gratitude to an old Spanish muleteer who many, many years ago invented
The Famous Diamond Hitch
As the boys' counting-out rhymes are told by one boy to another, so one muleteer told his fellows until it reached Mexico, was learned by the hardy prospectors and trappers, and from some one of them, Captain A. E. Wood, of the Fourth United States Cavalry, discovered the trick in 1879 and taught it to his men; and my cousin, a civil engineer, who has spent much of his time in the Wild West, learned the Diamond Hitch and taught it to me.
The Aparejo
The pack-saddle of the Mexicans is called an aparejo (as pronounced it would be spelled Ah-pahr-ai-ho in English), and is used in preference to the old saw-buck saddle. It is made of a leather bag attached to a very broad leather breeching. Inside is a slight springy framework of willow, and the space between is filled with straw.
Of course such a saddle is not to be found east of the Mississippi River; but one can easily be made of canvas, which in many respects is better than leather and is not so easily damaged by water. This saddle must be stiff at the bottom edges and corners, where considerable strain comes when the pack-rope is bound on. Before placing the saddle on your pack-horse, fold a blanket neatly on the animal's back and secure it with a wide girth. This will prevent the pack-horse's back from being rubbed and becoming sore.
For two whole days I worked with a rope to try and learn the diamond hitch, and though I had a printed and illustrated account which claimed to disclose the secret of this far-famed hitch, I might still be working at the problem had not my cousin, Wolcott LeClear Beard, chanced to come in. He showed me that on account of the lack of familiarity with the terms used, the writer and proof-reader had so mixed up things that no one could follow the description and throw the hitch. Taking a rope in his hand Mr. Beard then showed
How the Trick is Done
First, you need one short quarter-inch rope for a "sling rope" to hold the baggage in place while throwing the diamond hitch.
There must be two boys to do the packing. The boy on the near, nigh, or left-hand side of the pony or donkey, takes in his left hand the two ends of the sling-rope, and with his right hand throws the loop or "bight" of the rope across the pony's back and leaves it hanging there. The boys now left two bags or parcels and place them lengthwise, one on each side of the animal's back-bone.
The loop is now passed up and over the pack on the far, "off," or right-hand side. The loose end of the sling-rope nearest the animal's head, on the near side, is now passed up and over the near pack through the loop, brought down and tied in a square knot to the other end of the sling rope. The two packs are thus temporarily fastened to the animal's back and we are ready
To Throw the Diamond Hitch
The cinch is the band that goes under the horse's belly. In the West it is made of a number of parallel strings of horse-hair rope. A first-rate substitute can be made from the grass rope of a hammock; but a broad canvas or webbing band will answer our purposes.
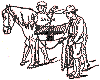
Fig. 319.
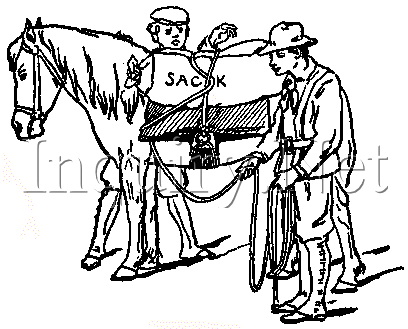
The cinch must have an iron ring on one end and an iron hook on the other (Figs. 318 and 326). Pass the cinch under the horse's belly, bringing the ring to which the pack rope is attached on the near side. The packer on the near side must throw the line to his companion on the far side, who passes it through the book and throws it back so that it lies forward of the portion previously passed over.
The near packer passes the free end of the rope down and under the standing part (which is the part fastened to the cinch) where it binds on the near pack, which of course brings the free end to the rear of the standing part. Bring the free end forward and diagonally down to the front of the saddle and under the front end of the aparejo or pack saddle (Figs. 318 and 319). Bring it back under the standing part and under the rear corner of the aparejo.
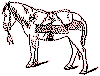
Fig. 320.
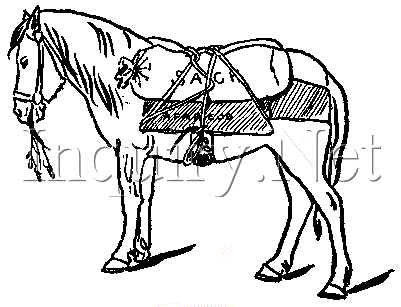
The free end is now thrown over the animal to the packer on the far side. The near packer guides the line diagonally forward over the packs, and the off packer pulls everything tight. In order to hold it the near boy grabs the rear corner of the aparejo and the rope under it with one hand and "pinches" it over the corner to prevent it from slacking, while the far packer passes the free end over and under the standing part at the middle of the horse's back between the two packs (Figs. 3l8 and 320). The far packer then passes the free end under the rear corner of his side of the aparejo and passes it forward under everything to the forward corner of the aparejo. He passes the line up over the forward corner of the aparejo and throws the free end over and back to the near boy. The near boy hauls everything tight while the far packer guides the pack rope diagonally back over the packs.
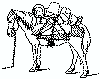
Fig. 321
The far man now "pinches" the line at the forward corner of the aparejo, while the near packer passes the line over and under that part of the pack rope which passes over the horse's back nearest his head (Fig. 318). He brings the free end diagonally forward and down under the forward corner of the aparejo (Figs. 318 and 321).
Everything is tightened for the last time, and the free end is brought back and fastened with a single bow-knot to the standing part at the ring (Fig. 321). The axe, the frying-pan, and such articles are thrust under the ropes (Fig. 321), and if the directions have been properly followed, the luggage will stick in its place even if the animal rolls over a cliff. There was once a mule that tried this, and although he fell thirty feet and did considerable damage to his luggage, he failed to dislodge it, and his pack broke his fall and saved his life.
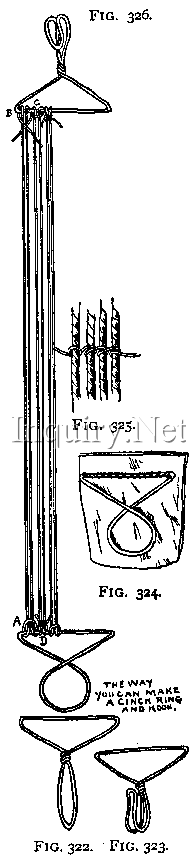
How to Make Your Own Cinch
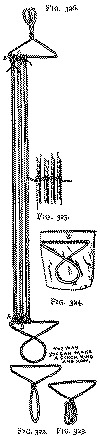
Figs. 322-326.
Home Made Cinch.
Procure some thick wire, and if you have no conveniences for iron work, go to the blacksmith shop and show the smith how to bend the wire, so as to make the ring (Fig. 326 D and Fig. 324). The base should not be less than eight or nine inches. Let him make another ring, elongate it and give it a twist, as in Fig. 322. Bend it over in a hook, as in Fig. 323; but, if you have a hammer, a hot fire, and an old paving stone for an anvil, you can make your own hook and ring.

Figs. 122-123
Now take some hammock string and fasten it with a lark's head to the ring (A, Fig. 326). Bring the two ends over to the base of the hook, around and up again, as shown by B in the same diagram, and tie in a square knot (Figs. 122-123). Repeat this, with a lark's head first at A, and a knot at B, and then with a !ark's head at C, and a knot at D, until the parallel strings fill up the space on the bases of the hook and ring. The length of the cinch depends upon the size of the animal that is to wear it. The ring and hook should come just under the edge of the pack saddle. Two inches on each side of the center of the cinch weave a small piece of twine, and tie the ends (Fig. 325) Weave two more strings four inches apart near the ring, and two more four inches apart near the hook. These are for spreaders. All that remains to be done is to fasten two broad sole-leather pads to your cinch, one under the hook and one under the ring. Punch holes with an awl or a nail in the leather, and bind it with twine on to the base of the hook and the ring (Fig. 324).
The advantage of a horse-hair cinch is that it will not slip, and the grass-twine of a hammock makes a first-class substitute. My cousin, who, as I have already said, has spent much of his time in the land of cowboys and diamond hitches, assures me that the grass-twine cinch possesses all the qualities claimed for it.